What I used:
1. a 6" wood circle from Hobby Lobby craft dept.
2. Black spray paint
3. Very small detailed branches from my yard. I cut mine at about 13"
4. Glue gun and glue sticks.
5. Black, Gray and Green craft paint and a Paint brush.
6. Thin card board I used priority mail box that I had from a package I recieved.
7. Cricut machine to cut my House, Spooky gate, and the fince. You could not use these and draw out and cut your own items. Or just do the cemetery with the trees.
What I did:
1. Spray painted my branches black ( Follow directions on can) I used Walmart brand flat black. .99 cents a can.
2. Paint the 6" wood circle black with black craft paint. Let dry
3. Glue branches onto wood circle.
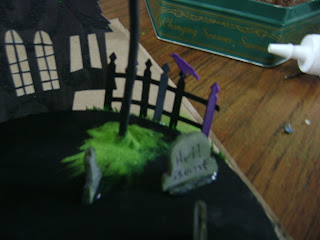
4. Draw and cut out your tomb stones. mine are all about 1" tall. I cut 2 of each from the thin cardboard and glued them together to create the thickness I wanted.
5. Paint them gray with craft paint. I used a green ink pad to enhance the edges but it can be dry brushed a little green around each one to make it look old.
6. Hot glue tomb stones onto wood circle. I did 3 on each side. I would have used more if I stayed with the cemetery only theme.
7. I added green flocking around my trees and then my tomb stones. If you can't find flocking ( I purchased mine at Michael's quite a while back I'm not sure they carry it anymore) you can use green paint or just cover your hot glue that is visible with black paint.
8.With my Cricut machine I cut my house at 12" and added some velum paper to the back to cover the windows.
9. My fince I cut at 1 1/2" the spooky gate was cut at 3"
10. I hot glued these items to the outside edges of the circle.
11. I used my hot glue gun to create small miss shaped rocks for my walkway from the gate to the Haunted house. When they dried I painted a little craft glue on each one and covered them with the green flocking. Again you could paint them what ever color you want. or not make any at all.
THATS IT!
I found this display so charming and cute. it really is so small. I hope you enjoyed the house tour. If you share this please link back to or share the information to my blog.
Thanks for dropping by. Hope to see you soon.
Deanna


